Jump to a question in this guide
- What are the wall, footing and floor actually doing?
- Where does the roof water go after it reaches the ground?
- What does a slope measurement tell you—and what happens after that slope?
- What can a damp mark or a white deposit tell you?
- Is the line in concrete, a coating or an interior finish?
- What did the earlier repair actually change?
- What could the inspection reach, and who should investigate the remaining question?
- How do you compare two repair proposals before buying?
- Could water collect at this window even outside a mapped flood area?
- What would show that the work addressed the reported water route?
- Water entry and structural movement are related questions that need separate assessment.
- Record the weather, location and recurrence of dampness.
- Compare visible repairs with their scope and follow-up evidence.
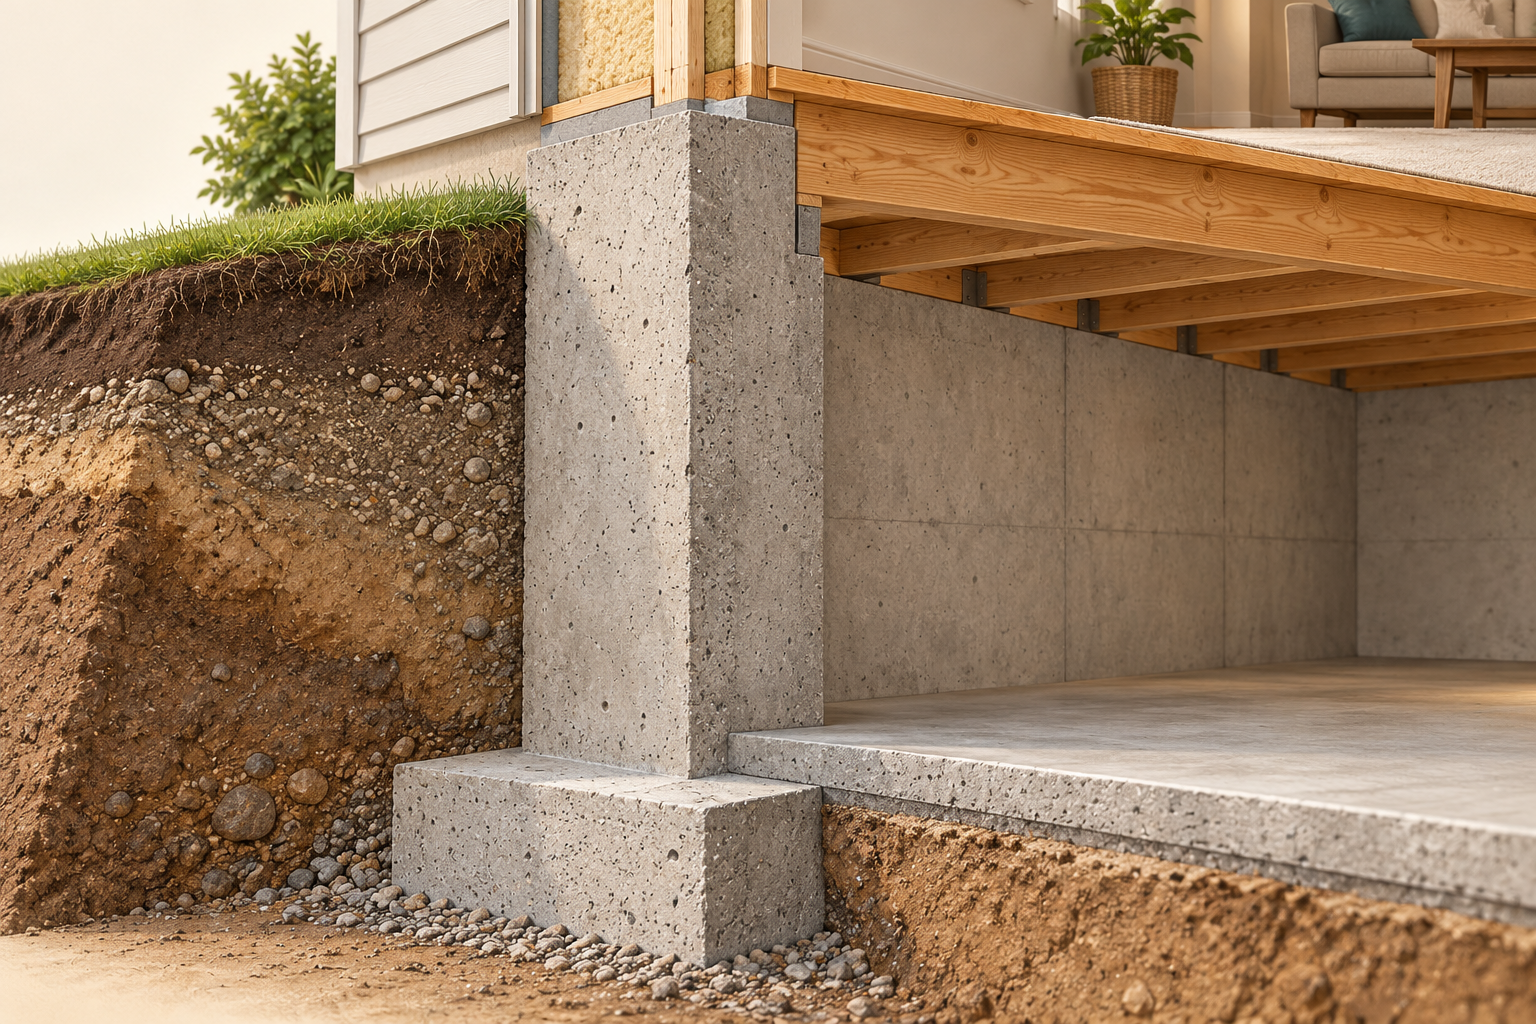
The foundation wall, wider footing, basement floor slab and timber floor above are different parts. First identify which part an inspection note describes. This concrete cutaway shows an example, not the home's support design or capacity.
About this illustration
Actual bearing, anchorage, connections, reinforcement and structural capacity Exact dimensions and assembly suitability Any property-specific foundation design or condition
10 picture lessons appear beside the questions in this guide. Use them to understand the explanation, then consider what it means for your home.
What are the wall, footing and floor actually doing?
A finished basement can look like the easiest room in a house to understand: carpet, painted walls and somewhere to put a sofa. The expensive questions are often behind those finishes or outside in the ground. Where does rainwater go? What holds up the house? If a wall was repaired, was the work intended to stop a leak, support the building, or simply replace a damaged finish?
You do not need to become a foundation contractor to ask better questions. Start with the physical parts and the job each does. Then connect what you can see with the seller's account, the inspection scope and the records for earlier work. A dry showing is useful, but it is one visit in one set of weather conditions.
This guide explains what to notice from safe, permitted access and how to compare an investigation or repair proposal. It does not turn a stain, a crack photograph or a drainage sketch into a diagnosis. If water, suspected instability, sewage or electrical hazards make an area unsafe, stay out and get appropriate help; do not continue the tour to complete a checklist.
The foundation wall is the part of the basement that meets the ground outside. In the concrete-basement example shown here, the wall sits on a wider base called a footing. The basement floor slab is the surface you walk on. These are different parts: a line in a floor slab is not automatically a crack through the wall, and a thin coating over concrete is not the entire foundation.
Follow two questions separately. The first is support: how does the building carry its loads to the ground? The second is moisture: how does the house keep water from reaching its rooms, and where does collected water go? A contractor may be hired to address one without assessing the other. Ask the inspector which foundation surfaces were visible and whether the observations call for structural advice, moisture investigation, or both.
Follow the moisture route in order. Rain or melting snow reaches the surface; grading and roof-water arrangements influence where it goes. Water can also move through the soil toward the foundation. A crack, opening or joint can become an entry route. A wall's water-control layer and a drainage system perform different jobs: one resists water passing through the assembly, while the other collects water and gives it a route onward. Neither job is complete merely because a visible black sheet or a pump is present.
A house may have poured concrete, concrete block, stone, preserved wood or a combination of foundations and additions. The teaching cutaway is one concrete-basement arrangement. Ask what this property actually has rather than transferring the picture's layers or buried pipe route to the address. An unfinished utility corner may reveal a material that a finished room conceals, but it does not reveal the entire perimeter.
The useful purchase question is specific: “What supports this part of the house, what could you see, and which concern still needs another specialist?” That is more informative than asking whether a foundation is simply good or bad. Do not enter a crawlspace, open finishes or go into an excavation to obtain an answer during a showing.
Identify the wall, footing, floor slab and floor framing before interpreting an inspection note.
The foundation wall, wider footing, basement floor slab and timber floor above are different parts. First identify which part an inspection note describes. This concrete cutaway shows an example, not the home's support design or capacity.
Choose a part name to highlight its explanation below.
- Foundation wall
Concrete wall at the ground-facing basement edge
- Footing
Wider base beneath this illustrated wall
- Floor slab
The separate basement walking surface
- Floor joists
Timber members supporting the floor above
About this illustration
Actual bearing, anchorage, connections, reinforcement and structural capacity Exact dimensions and assembly suitability Any property-specific foundation design or condition
Where does the roof water go after it reaches the ground?
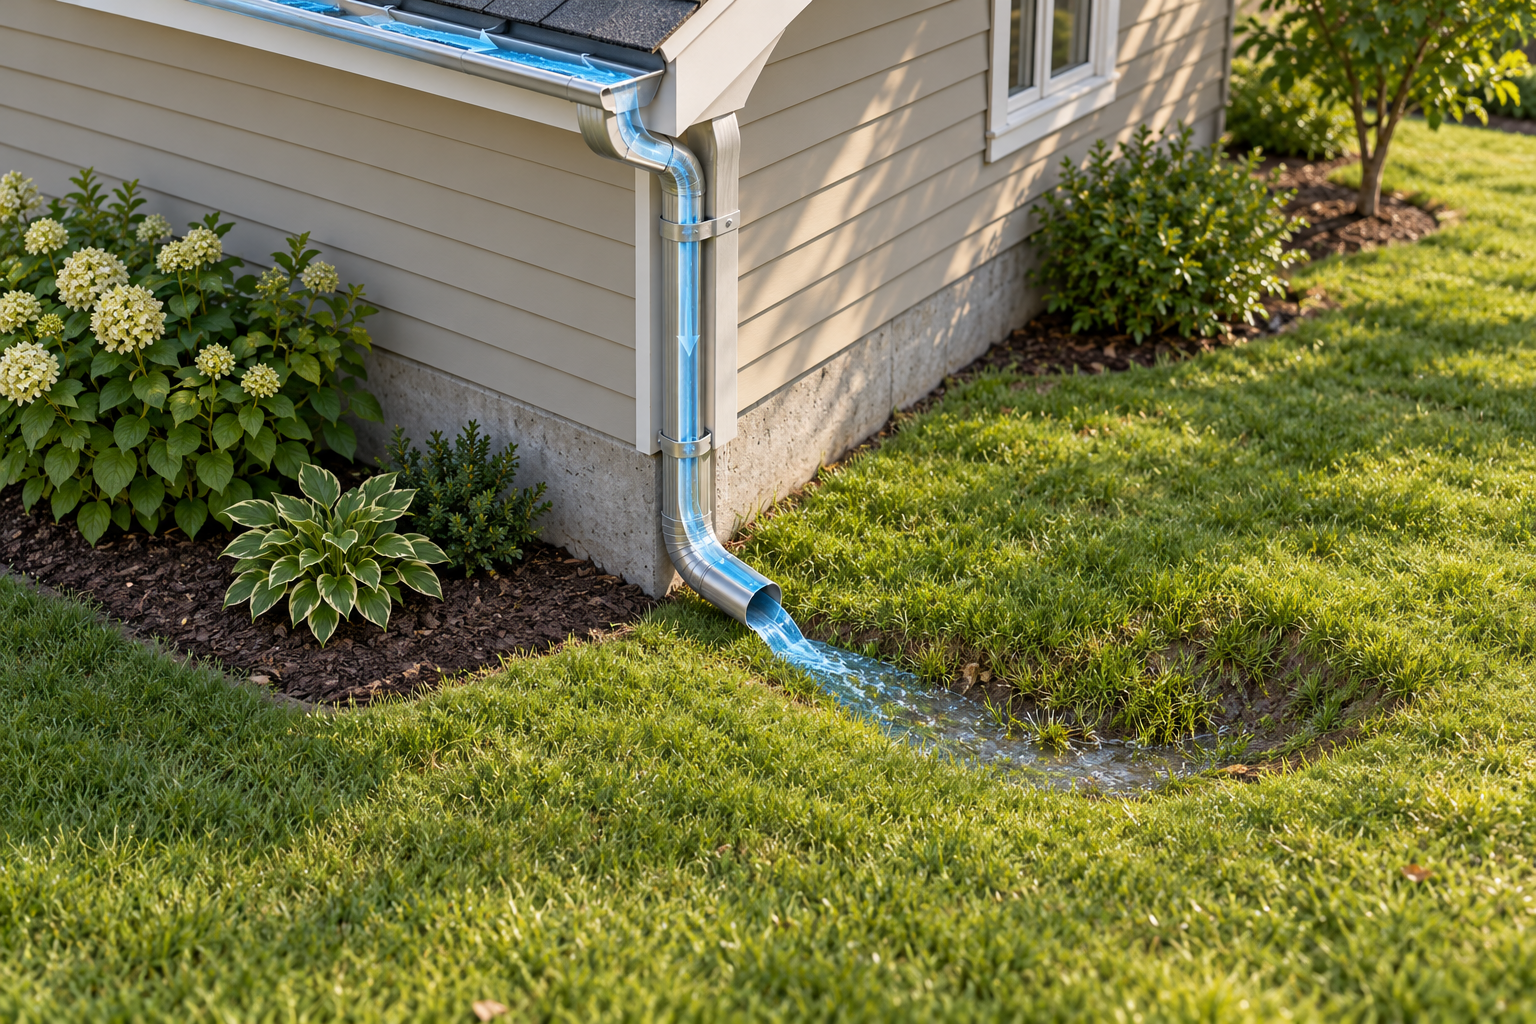
Eavestroughs collect water at the roof edge. Downspouts bring it to a lower outlet. The job is not finished at the bottom of that pipe: the receiving ground or approved drainage system must carry the water onward. A downspout that ends beside a wall and a nearby low spot are worth recording together, because the outlet location and the surface route form one question.
From accessible ground, look for disconnected sections, overflow marks, sunken paving and depressions beside the building. A discharge extension can be present while pointing toward a low area. Conversely, an unfamiliar underground connection may have an intended route that cannot be identified by looking at its top. Ask the owner and the drainage professional where it goes; do not disconnect a buried pipe based on a generic illustration.
Photograph the outlet, the ground beside it and the next visible part of the route. Include enough context to identify the side of the house. Ask whether pooling or dampness happened during rain, snowmelt or a particular overflow event. A photograph made on a dry afternoon cannot recreate those conditions, but it can help a specialist relate the reported event to the site.
Do not treat moving water away from one wall as permission to send it toward a neighbour, walkway or another vulnerable opening. Calgary's positive-drainage guidance is a local example of this whole-route responsibility. Elsewhere, ask the municipality about the relevant drainage pattern and restrictions before a contractor proposes changes.
Follow water from gutter and downspout to the outlet, then ask about the onward route.
The gutter and downspout bring roof water to a short outlet beside this grassy hollow. The blue route is conceptual: the next question is where water goes after leaving the pipe. The picture gives no approved discharge distance or proof of a basement leak.
Choose a part name to highlight its explanation below.
- Gutter
Collects water at the roof edge
- Downspout
Carries roof water downward
- Outlet
Short elbow where the illustrated flow leaves the pipe
- Grass hollow
Receiving low spot that raises an onward-route question
About this illustration
A measured grade, rainfall, discharge rate or distance Onward drainage beyond the visible depression A foundation leak, underground connection or code compliance
What does a slope measurement tell you—and what happens after that slope?
Grading means the shape and elevation of the ground. A swale is a broad, shallow drainage depression used to carry surface water along a planned route. In a side yard, the slope beside the house and the route down the yard have different jobs. The first can move water away from the wall; the second must give that water somewhere appropriate to continue.
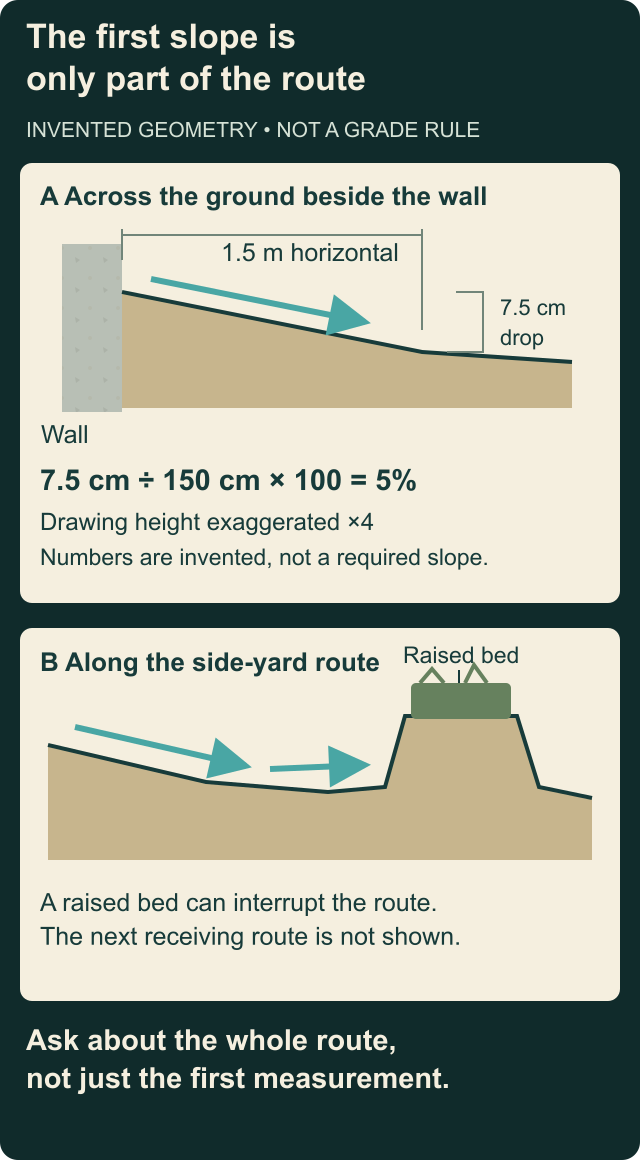
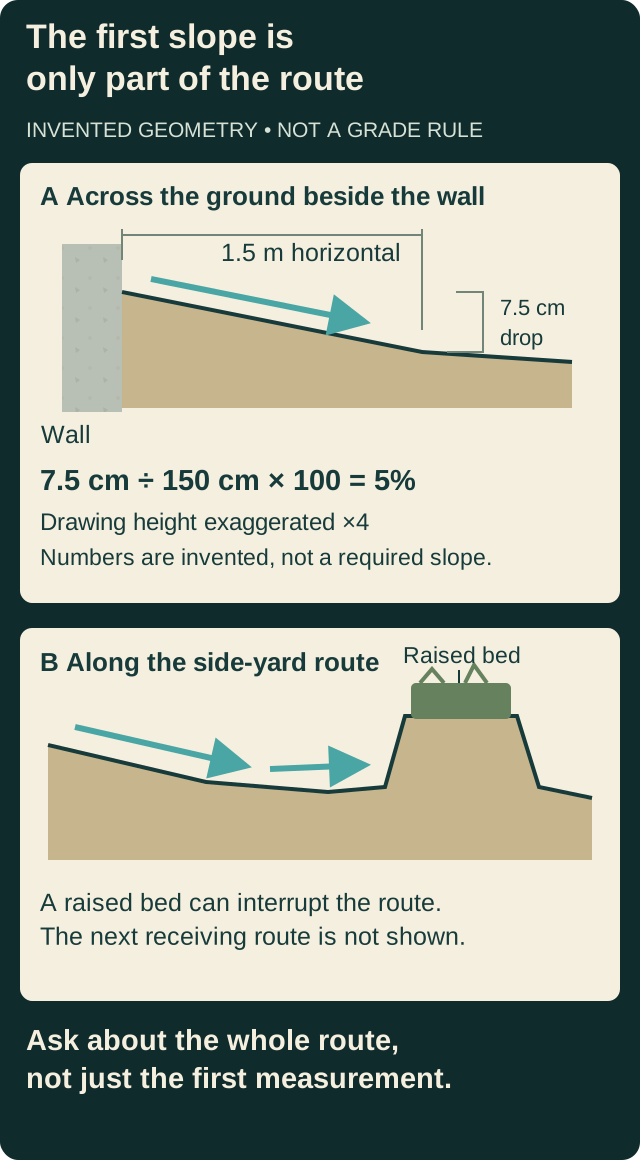
The illustrated numbers are an arithmetic example, not a construction requirement: a drop of 7.5 centimetres over a horizontal 1.5 metres gives 5%, because 7.5 ÷ 150 × 100 = 5. Reversing the slope reverses the direction. A photograph's perspective does not establish these elevations, and this example does not set the correct grade for a real lot.
A garden bed, fence work, paving or stored material may interrupt a route even where the first stretch appears to slope away. Ask whether a grading plan or survey exists and whether later landscaping changed the visible arrangement. A certificate records a particular scope and time; it does not maintain the ground or settle every current drainage question.
Before accepting a proposal to add soil or reshape paving, ask how it affects nearby openings, cladding, boundaries and the rest of the route. Have the professional explain the actual elevations and local requirements. This is not an invitation to perform a water test, excavate beside the house or copy the drawing's slope onto another property.
The first slope is only part of the route
The first profile shows an invented fall away from a wall. The second looks along a wider route where a raised bed interrupts it. A local slope and the continuing drainage route answer different questions.
Choose a part name to highlight its explanation below.
- Across the ground
Profile A shows invented geometry beside a wall, not a required grade.
- Along the route
Profile B shows a raised bed interrupting the onward route.
The first slope is only part of the route
The first profile shows an invented fall away from a wall. The second looks along a wider route where a raised bed interrupts it. A local slope and the continuing drainage route answer different questions.
- Invented arithmetic
- Profile A is an invented arithmetic example. The horizontal run is 1.5 metres, or 150 centimetres; the drop is 7.5 centimetres. Slope = 7.5 ÷ 150 × 100 = 5%. Both quantities use centimetres in the calculation.
- Drawing scale
- The height is drawn four times larger relative to the horizontal scale so the fall can be seen. The drawing is not a survey or construction layout.
- Along the side yard
- Profile B looks along the side-yard route rather than across the first slope. The raised bed interrupts the illustrative swale. A swale is a broad, shallow depression used to carry surface water.
- The continuing route
- A surface may fall away from the wall while its onward route still needs investigation. No property boundary, municipal receiving connection or correct grade for a real lot is supplied.
- Before changing the ground
- Ask a qualified provider about the actual elevations, later landscape changes, whole route and local requirements. Do not reproduce the drawing as a grading instruction or stage a water test.
Read all the diagram text
- The first slope is
- only part of the route
- INVENTED GEOMETRY • NOT A GRADE RULE
- A Across the ground beside the wall
- Wall
- 1.5 m horizontal
- 7.5 cm
- drop
- 7.5 cm ÷ 150 cm × 100 = 5%
- Drawing height exaggerated ×4
- Numbers are invented, not a required slope.
- B Along the side-yard route
- A raised bed can interrupt the route.
- The next receiving route is not shown.
- Raised bed
- Ask about the whole route,
- not just the first measurement.
What can a damp mark or a white deposit tell you?
A mark is a starting point for an explanation. Record the affected material, its location and whether it is currently wet. A stain on a wall finish, dampness at a pipe and a white powdery deposit on masonry should not be merged into one finding called foundation failure. They may lead to different follow-up questions.
White mineral deposits on concrete or masonry are commonly called efflorescence. A white patch in a photograph still needs to be identified; its appearance alone does not tell you where moisture came from. Peeling paint and a tide-like stain can help locate a moisture question without dating it. A cold pipe with surface droplets raises an indoor moisture question that is different from seeing water enter through a wall joint.
Ask when the mark was first noticed, whether it returns and which weather or household activity preceded it. Fresh paint may be ordinary decorating, and an old stain may remain after work; neither establishes intent or current leakage. Pair the seller's account with dated photographs and the repair location, then ask a competent investigator which explanations remain plausible.
Moisture readings and thermal images belong in a method, not on a pass/fail sticker. Ask what material was measured, what comparison was used, what access was available and whether the result identifies a source or only a condition requiring investigation. A number or colour alone does not explain where the moisture came from. NRCan explains that moisture can arrive as liquid water, move through narrow pores by capillary action, or arrive as vapour that later condenses. A specialist needs to distinguish those processes before recommending a remedy.
Locate peeling finishes, chalky deposits and low-wall marks without diagnosing from appearance alone.
Peeling paint and chalky deposits help you locate a moisture question. Describe the affected surface and ask when the mark recurs before choosing a repair.
Choose a part name to highlight its explanation below.
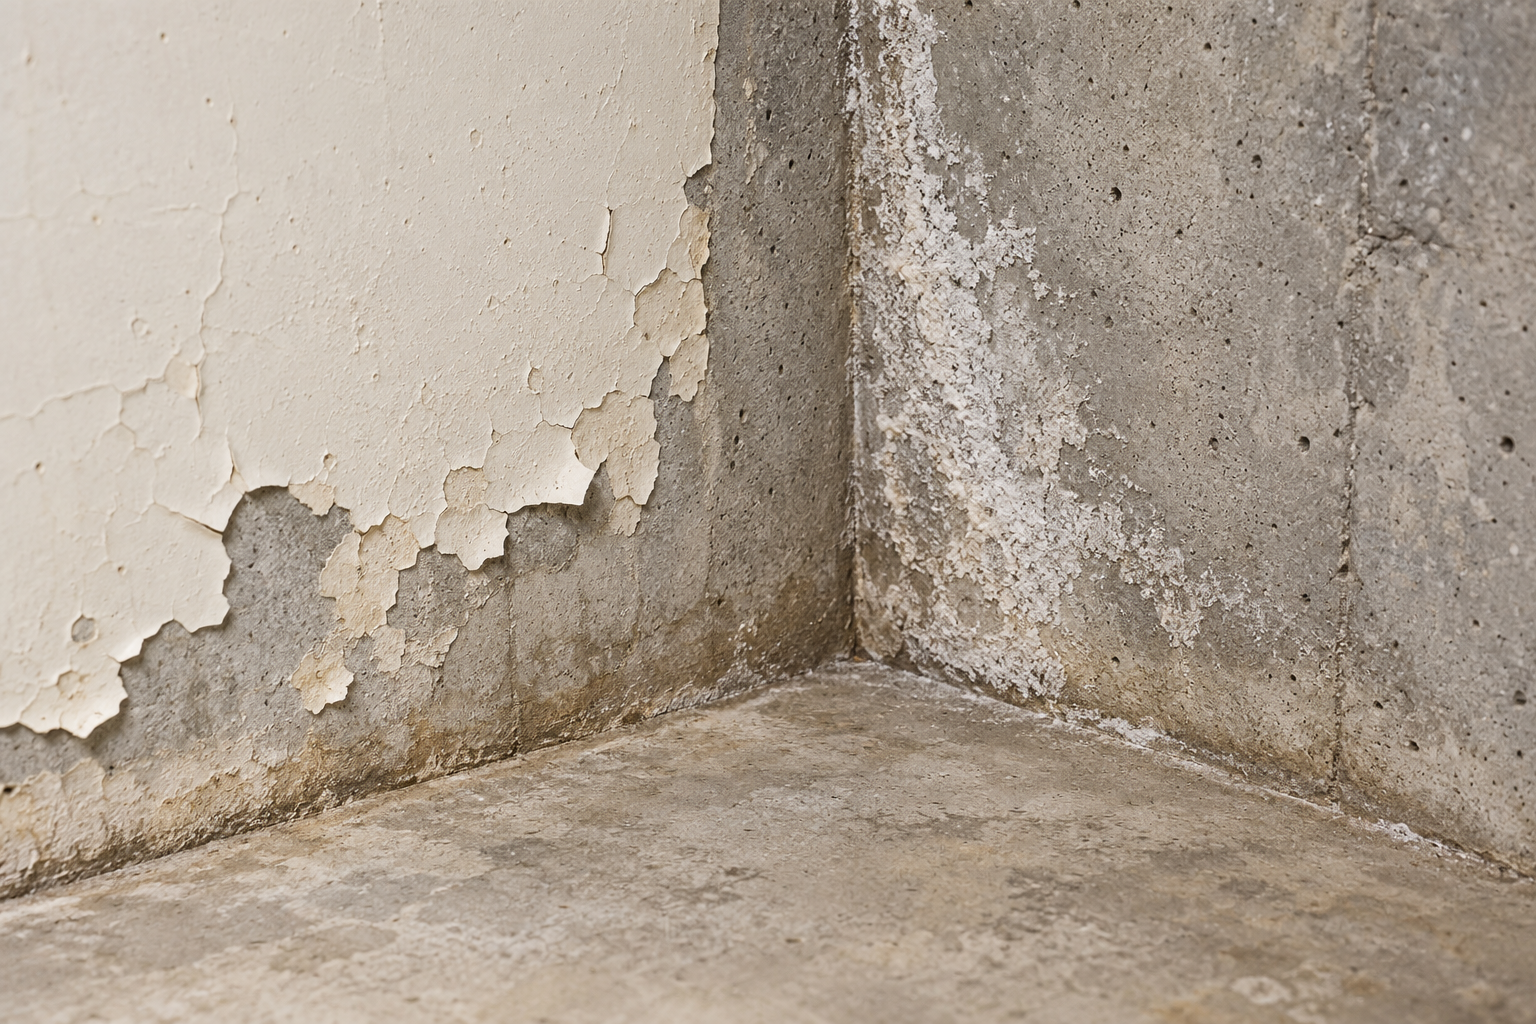
- Paint finish
a surface showing peeling
- Chalky deposit
a visible material to identify
- Lower wall and floor junction
the location of the darker band
About this illustration
The appearance does not identify mould, the material in a deposit, an active leak or its cause.
Is the line in concrete, a coating or an interior finish?
First identify the surface. Parging is a protective or finishing coating that may cover a foundation; drywall is an interior finish. A line visible in either does not show the full condition behind it. The paired picture separates a crack-like line in exposed concrete from a line in a thin outer coating, so readers can see why the material name belongs in the inspection description.
From safe access, note the line's location, direction, approximate extent and any visible offset. If a photograph can be taken safely, include a scale and a wider view that locates it on the wall. A scale makes a record easier to compare; it does not supply a universal safe width. Do not scrape a coating, chip concrete or expose a line during a showing.
The important follow-up is change and context: has the line lengthened, opened, leaked or been assessed? A single photograph cannot establish movement over time. If movement or support is a concern, ask a qualified structural professional what further assessment is warranted and which surfaces or records they need.
A seal across a line may have been installed to address water entry. It should not be described as structural reinforcement unless the actual design and completion records say that was the scope. The reverse distinction matters too: a structural opinion does not automatically explain every moisture symptom. Keep the professional's actual conclusion and exclusions with the relevant location.
Separate a surface coating from its concrete backing when describing a line or repair.
The left view separates a thin surface layer from its concrete backing; the right makes concrete visible. Ask which material the reported line is in and what the inspector could see.
Choose a part name to highlight its explanation below.
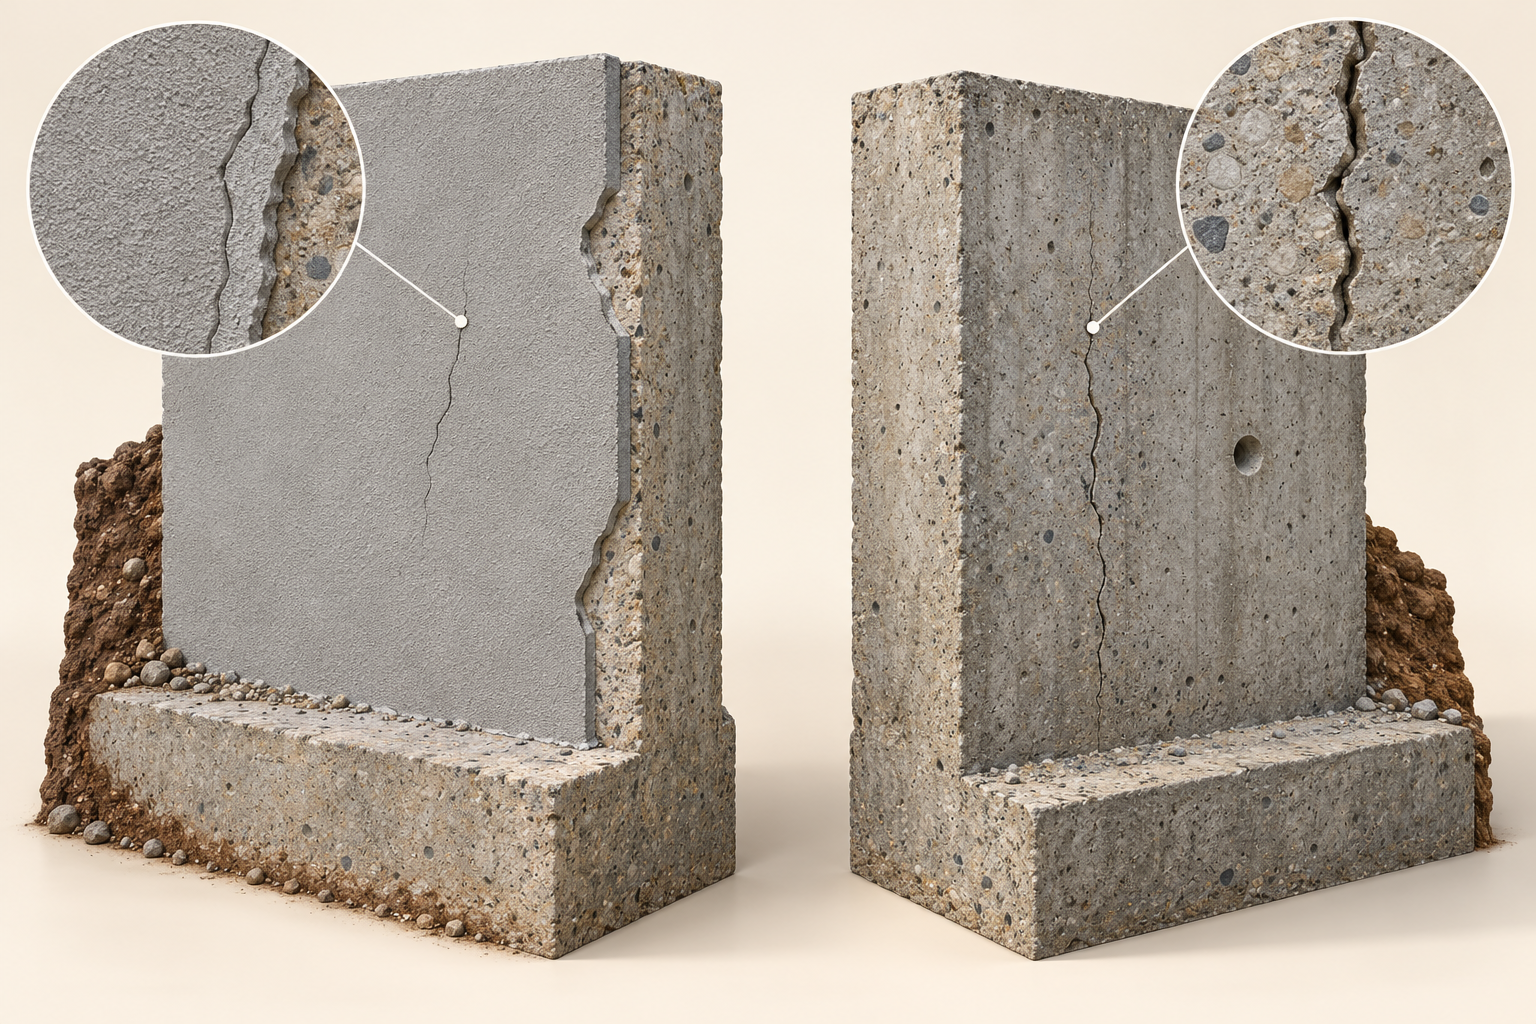
- Surface coating
a thin outer layer over backing
- Concrete
visible backing and wall material
- Magnified inset
texture, not measured movement
About this illustration
No scale, movement over time, structural capacity or actual repair need is established.
What did the earlier repair actually change?
Ask for the problem description before the invoice total. Was water reported at one wall penetration, along a wall-floor junction, through a crack, or from a drain? Then match that location with the assessment, proposal, completion photographs and invoice. A photograph taken while the wall was exposed can be especially useful because the same parts may now be buried or covered.
An exterior project may expose the foundation so a professional can address wall surfaces, protective layers and drainage. An interior project may collect water and route it to a sump. A crack treatment may address a particular opening. Replacing carpet or drywall restores a room but is a different task from changing the water route. Avoid letting the single word “waterproofing” erase those distinctions.
The exterior cutaway is a conceptual view of different jobs, not a product system or installation detail. Ask which layers and connections were actually installed, how the drainage reaches an approved destination, and which parts were outside the contract. Ask who was responsible for design, permits where applicable, excavation safety and restoration. Do not use an illustration to plan digging beside a footing.
A textured drainage sheet should not automatically be called waterproofing. NRCan notes that some dimpled membranes need an additional waterproofing material. The actual product system and its connections matter. A proposal should name the materials and their intended jobs rather than rely on a photograph of a dark covering. The source describes retrofit approaches; it does not approve any product combination for this property.
Read any warranty with the scope it covers, the named property, the relevant dates and the actual transfer terms. Ask the provider and your transaction advisor about unclear terms rather than assuming a guarantee applies to all future basement water. Keep completed work distinct from a recommendation that was quoted but never performed.
Different layers do different water-control jobs
The wall, a specified water-control layer, a drainage layer and a collection drain perform different jobs. The layers are pulled apart here to explain those jobs; the off-frame receiving destination still needs to be established.
Choose a part name to highlight its explanation below.
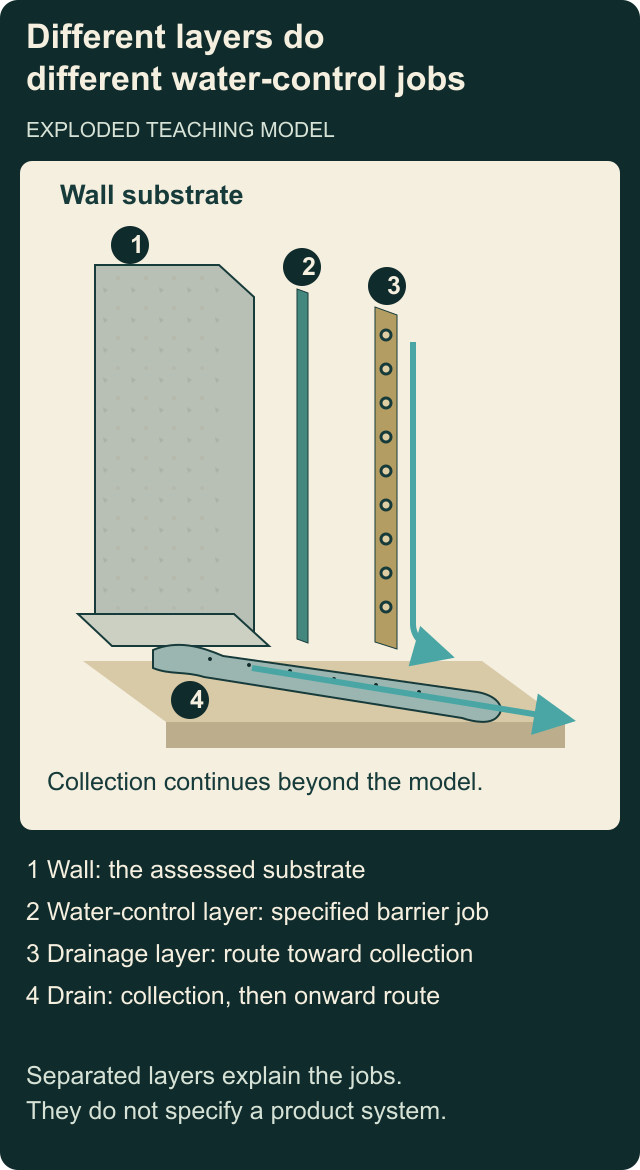
- Wall substrate
The concrete wall is the surface to be assessed.
- Water-control layer
Its specified job is to resist water passing through the assembly.
- Drainage layer
The separate layer illustrates a route toward collection.
- Collection drain
The drain continues beyond the model; the receiving destination is not shown.
Different layers do different water-control jobs
The wall, a specified water-control layer, a drainage layer and a collection drain perform different jobs. The layers are pulled apart here to explain those jobs; the off-frame receiving destination still needs to be established.
- Wall substrate
- 1. Wall substrate: the concrete wall in this conceptual model is the surface to be assessed. No actual condition, support capacity or repair need is shown.
- Water-control layer
- 2. Water-control layer: its specified job is to resist water passing through the assembly. The illustration does not name a product or certify its performance.
- Drainage layer
- 3. Drainage layer: the separate textured layer illustrates a route toward collection. NRCan notes that some dimpled membranes are not waterproof and need an additional waterproofing material. Texture or colour does not establish the actual product system.
- Collection drain
- 4. Collection drain: the illustrated buried component collects water and continues beyond the model. Its actual destination, connections, condition and appropriate local arrangement require records and qualified advice.
- The separated model
- The gaps between layers are explanatory. They are not an installation sequence, required thickness, excavation method or permission to dig beside a footing. No soil-supported open trench or worker is depicted.
Read all the diagram text
- Different layers do
- different water-control jobs
- EXPLODED TEACHING MODEL
- 1
- Wall substrate
- 2
- 3
- 4
- Collection continues beyond the model.
- 1 Wall: the assessed substrate
- 2 Water-control layer: specified barrier job
- 3 Drainage layer: route toward collection
- 4 Drain: collection, then onward route
- Separated layers explain the jobs.
- They do not specify a product system.
What could the inspection reach, and who should investigate the remaining question?
A finished basement makes an ordinary room easier to use while making parts of the foundation harder to see. Drawers, stored belongings, insulation and wall finishes can limit access. Ask the inspector to identify the visible areas and the important inaccessible ones, rather than interpreting “no visible concern” as a statement about concealed surfaces.
Start a request for further assessment with the actual observation: “water reported after snowmelt at this corner,” “a visible offset at this location,” or “a pipe leak reported when this fixture was used.” A building-envelope or drainage specialist, structural engineer and plumber answer different questions. One may recommend involving another; the aim is an appropriate scope, not a promise that a single visit will settle every possibility.
Ask what the proposed assessment includes, which seasonal conditions may not be reproduced and whether it requires authorized access beyond a routine inspection. A specialist can explain whether opening a finish, surveying, monitoring or another procedure would help. A buyer should not make those openings or stage a flood test themselves.
Unsafe conditions take priority over documentation. Do not enter a flooded or potentially energized area, handle sewage or approach suspected instability for a better photograph. A safety response and a later purchase investigation are separate tasks. The current Calgary seepage page tells people to stay out of the basement during seepage or flooding; local emergency instructions govern the actual event.
Compare what a finished wall conceals with what an accessible utility corner reveals.
The finished wall hides the surface behind it; the adjoining utility corner leaves concrete and a pipe visible. The separated finish edge is an explanatory cutaway. It does not reveal the condition behind an intact wall.
Choose a part name to highlight its explanation below.
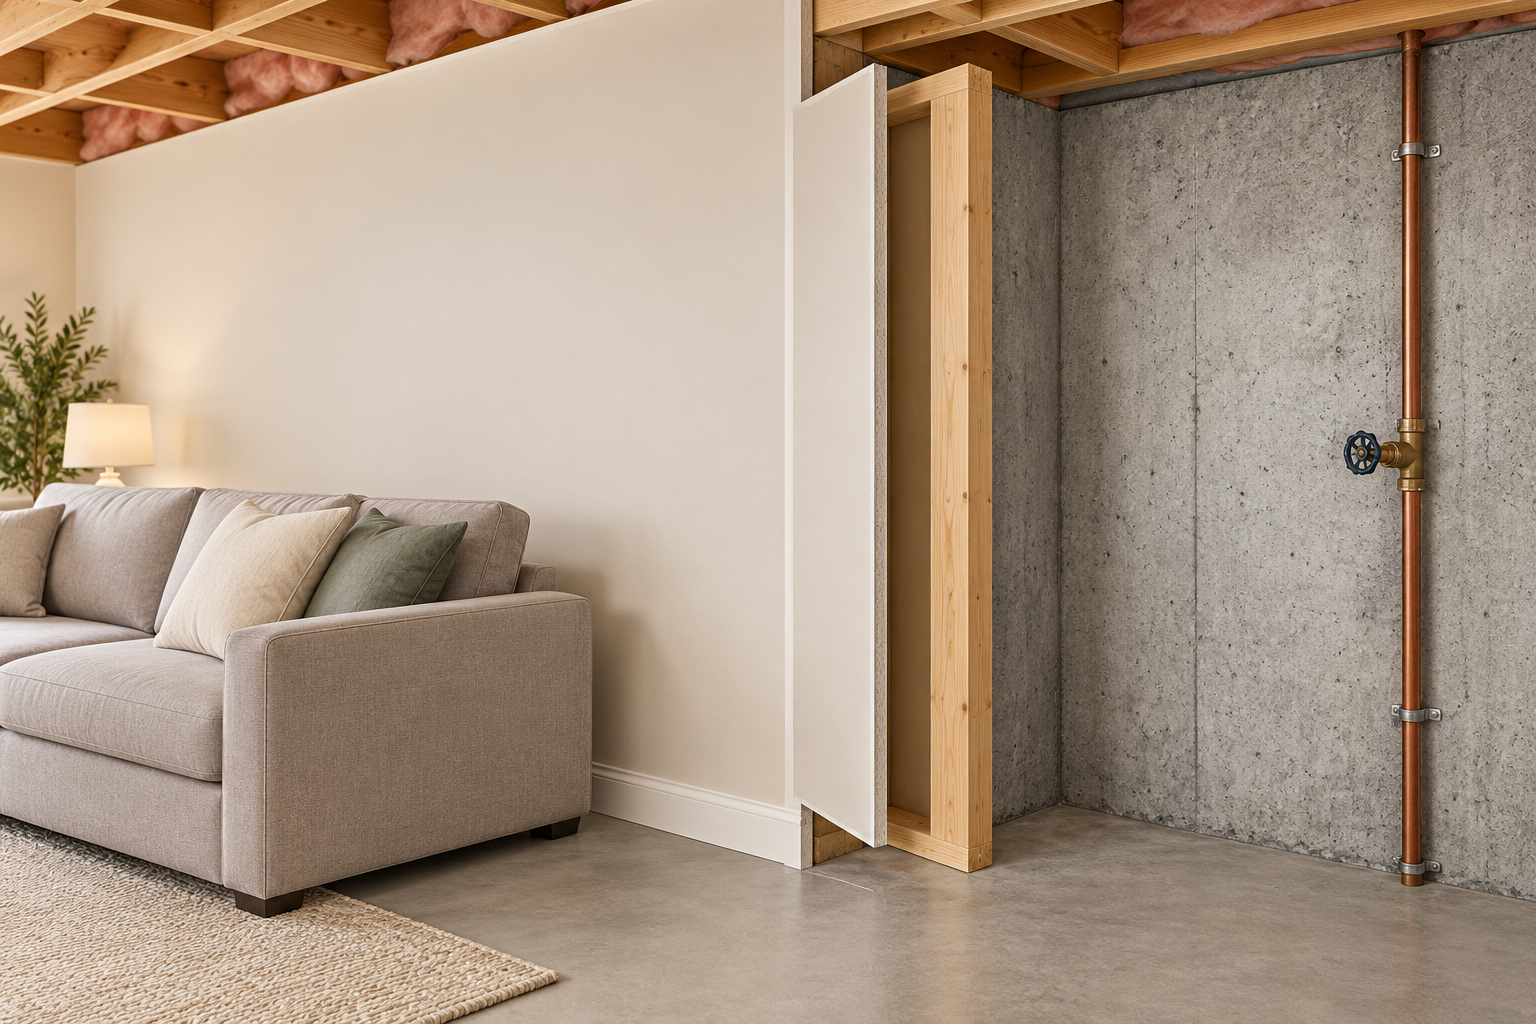
- Finished wall
Opaque face concealing the wall behind
- Separated finish edge
Illustrative cutaway explaining the concealment
- Visible concrete
Surface available to observe in this open corner
- Pipe
Separate visible plumbing observation
About this illustration
Condition or materials behind the intact wall Actual inspection access or permission to open finishes Pipe service, operating state or leak history Approval or completeness of the illustrated wall assembly
How do you compare two repair proposals before buying?
Two prices can be impossible to compare when the contractors are pricing different problems. Put each proposal beside the same location sketch. Ask what symptom and mechanism it addresses, which walls or rooms are included, what must be opened, what equipment or drainage is involved, and what has to be put back afterwards.
One proposal might address an exterior wall and another might collect water inside. A third might only repair damaged finishes. That does not make one automatically right or wrong; it means you need the provider's explanation of why that scope fits the assessed cause. Ask about access, reinstating landscaping or flooring, dependencies, exclusions and any further work left to another trade.
The comparison picture uses two explicitly invented, unpriced scopes to teach this reading task. It gives no market price, warranty promise, engineering recommendation or preference for interior versus exterior work. The decision belongs to the actual assessment and property constraints.
If an unresolved issue matters to your intended basement use or purchase budget, discuss it while the transaction still allows investigation. Your realtor and legal advisor can explain the agreement and timing; the relevant technical professional explains the condition and proposed work. Sellers help by providing accurate records of the locations and completed scopes without promising a universally dry basement.
Compare what the work actually includes
Both illustrative proposals concern the same basement, but they include different locations, access and restoration. Compare the work behind the price and ask why it fits the assessed cause.
Choose a part name to highlight its explanation below.
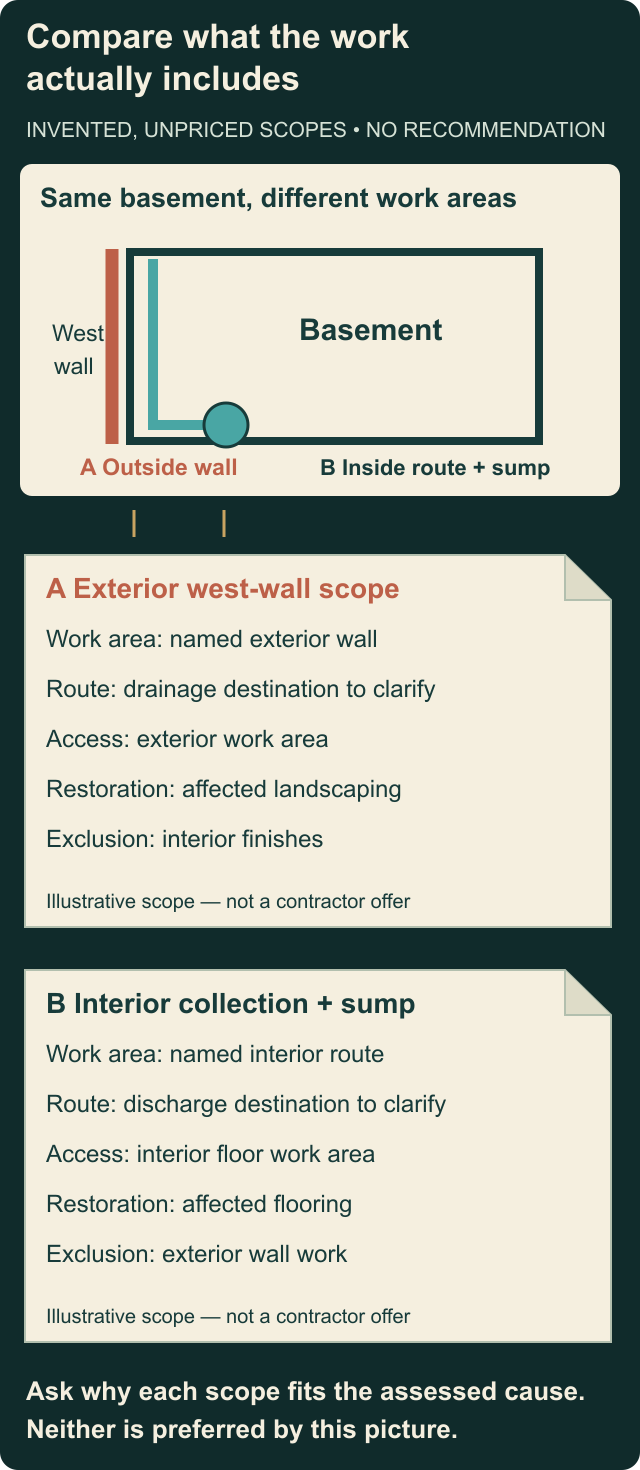
- Exterior scope A
The west-wall scope includes exterior access and affected landscaping.
- Interior scope B
The collection-and-sump scope concerns interior floor access and restoration.
- Different exclusions
The two illustrative scopes leave different work outside the proposal.
Compare what the work actually includes
Both illustrative proposals concern the same basement, but they include different locations, access and restoration. Compare the work behind the price and ask why it fits the assessed cause.
- Illustrative proposals
- These are original, explicitly invented and unpriced teaching examples. The map supplies no measured wall length, property boundary, contractor or real repair recommendation.
- Exterior scope A
- Scope A identifies an exterior west-wall work area. Its drainage destination needs clarification; exterior access and affected landscaping restoration are part of the described scope. Interior finishes are excluded.
- Interior scope B
- Scope B identifies an interior collection route and sump. Its discharge destination needs clarification; the described access and restoration concern the interior floor. Exterior wall work is excluded.
- Compare the actual work
- For each real proposal, ask what reported problem and assessed cause it addresses, which wall or length is included, how access works, where water goes, what has to be restored and which tasks are excluded or assigned to another trade.
- Check suitability
- The differences do not make one option automatically suitable. Ask the actual provider for the property-specific reason, dependencies and limitations; obtain appropriate transaction advice before relying on a repair arrangement.
Read all the diagram text
- Compare what the work
- actually includes
- INVENTED, UNPRICED SCOPES • NO RECOMMENDATION
- Same basement, different work areas
- West
- wall
- Basement
- A Outside wall
- B Inside route + sump
- A Exterior west-wall scope
- Work area: named exterior wall
- Route: drainage destination to clarify
- Access: exterior work area
- Restoration: affected landscaping
- Exclusion: interior finishes
- Illustrative scope — not a contractor offer
- B Interior collection + sump
- Work area: named interior route
- Route: discharge destination to clarify
- Access: interior floor work area
- Restoration: affected flooring
- Exclusion: exterior wall work
- Illustrative scope — not a contractor offer
- Ask why each scope fits the assessed cause.
- Neither is preferred by this picture.
Could water collect at this window even outside a mapped flood area?
A window well holds soil away from a below-grade window and needs a way for water to leave. Leaves, snow, ponding and the window's condition are useful observations from safe ground. In the illustration, the window, gravel and leaves are visible; a definite standing-water level and buried drain are not. The gravel surface alone does not show a buried connection or prove that it works.
Ask where that well drains and whether the installation or maintenance records identify its route. Do not climb into the well, dig for a pipe or fit a cover that compromises an emergency escape opening. Cover and escape requirements depend on the actual window and applicable local rules. Broader mapped exposure, the well's drainage and the insurance decision remain connected but distinct questions.
A public flood map describes a defined hazard and scenario over an area. A basement observation concerns a location in a building. Keep those scales separate. Being outside one mapped river scenario does not explain water entering at a basement window, and a mark below a window does not prove a river flooded the property.
Look at the map's legend, date, geographic coverage and stated limitations. Preserve those details with a saved view. Ask the mapping authority what the product represents and ask the insurer about the actual address and policy.
Recognize the well, low window, gravel and leaves, then ask about the actual drainage route.
The well holds soil back from the window. Leaves and the gravel surface are visible here; ask how this well drains and whether water has collected against the frame.
Choose a part name to highlight its explanation below.
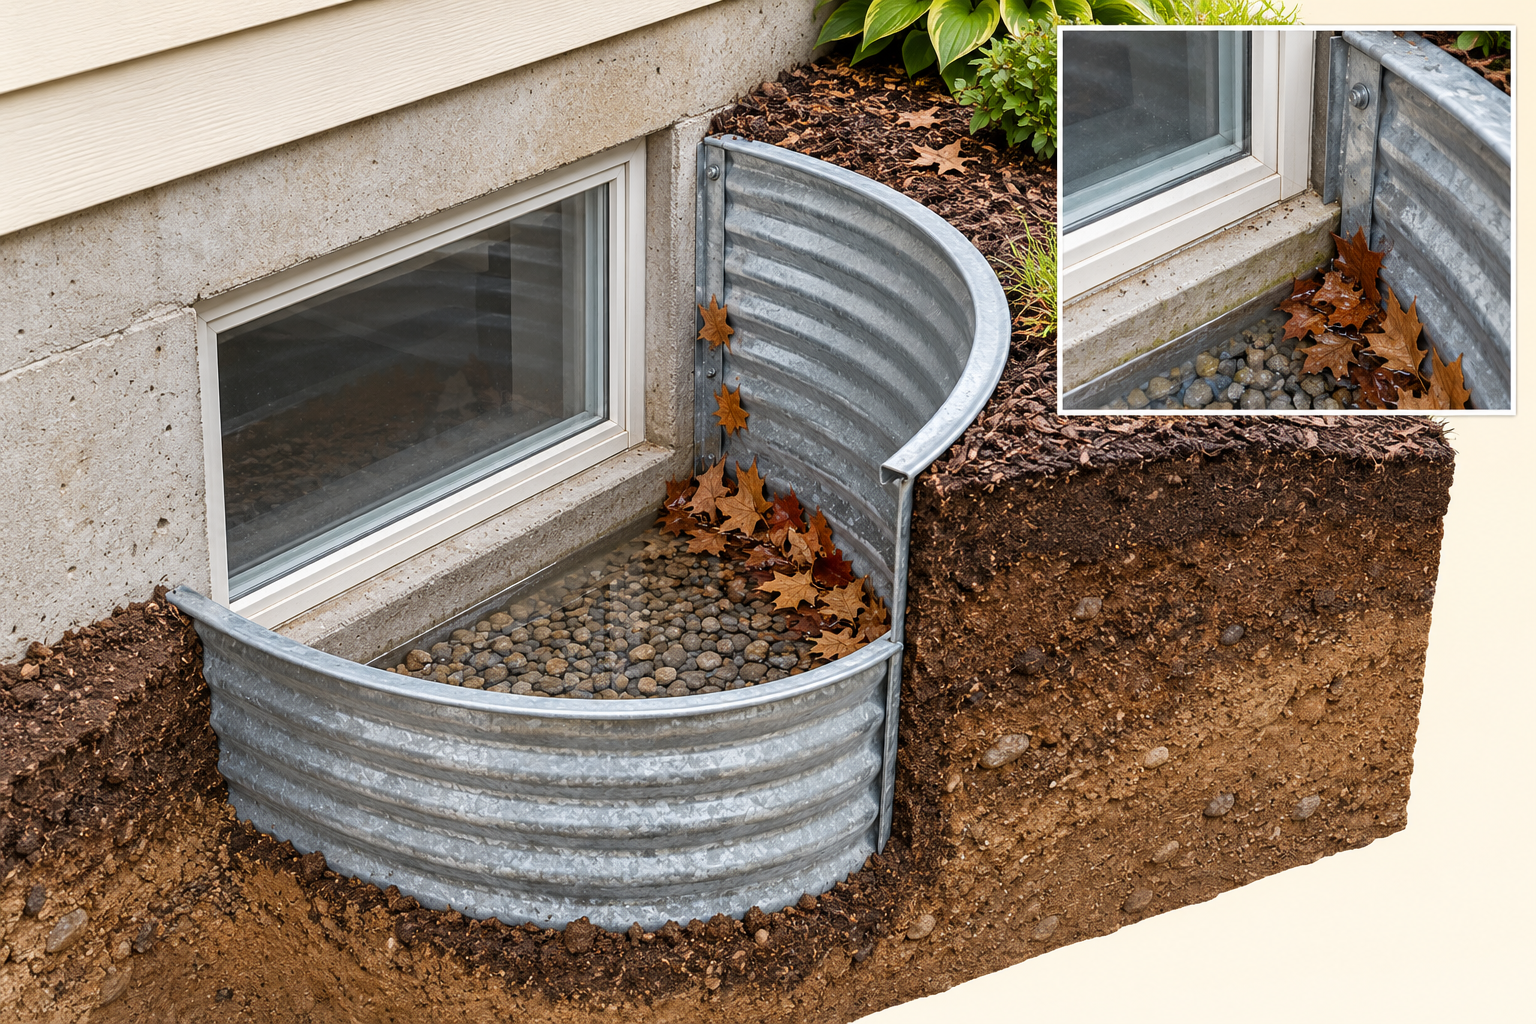
- Window and frame
the low opening
- Window well
holds soil away from the window
- Gravel and leaves
visible surface and maintenance observations
About this illustration
The picture establishes no standing-water level, buried drain route or drain performance.
What would show that the work addressed the reported water route?
Start with the exact purpose of the completed work. If a crack was treated, ask which crack and what problem the treatment was intended to address. If a drain was added, ask where it collects water, where it goes and how the completion record describes that route. If a sump was involved, ask for the matched operating and maintenance information; a pump sitting in a pit does not describe every buried connection.
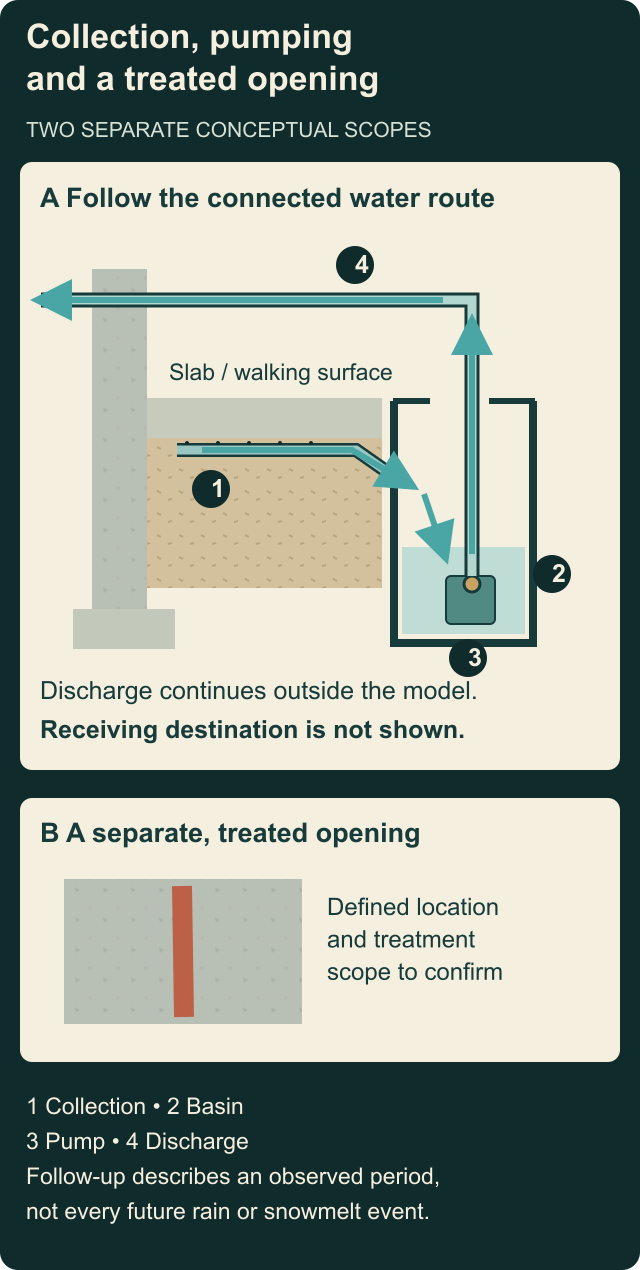
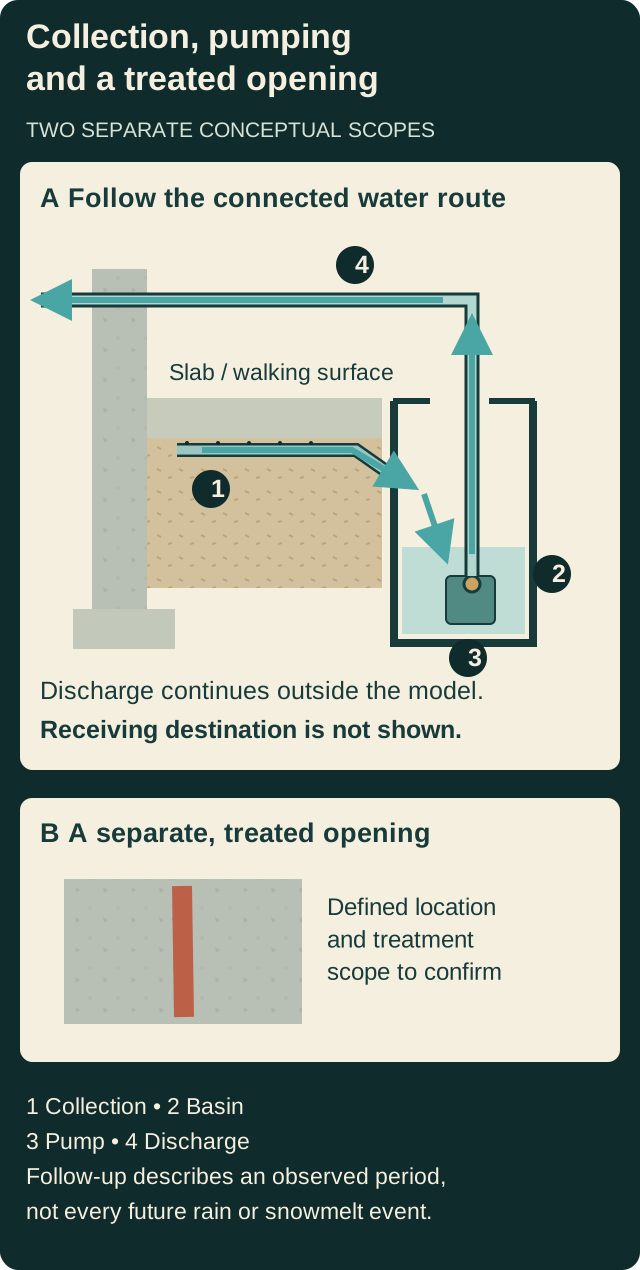
The final cutaway separates collecting water near the foundation, receiving it in a sump basin, pumping it through a discharge pipe and delivering it to the appropriate receiving route. The adjacent sealed-crack view illustrates a different scope. These are conceptual examples, not a combined prescription for the home or permission to connect to a particular municipal pipe.
Ask what happened after the work during the conditions that previously caused the symptom. Dated follow-up through rain or snowmelt can be more useful than a general statement that the room has looked dry. It still describes the observed period rather than guaranteeing performance in every future event. Do not manufacture severe conditions to produce a test.
Leave with a useful set of answers: which areas were assessed, what was actually done, what remains inaccessible or seasonally uncertain, and who is responsible for the next agreed task. Keep the original reports and location photographs after possession. For detailed pump operation, crack monitoring, grading stages or sewer backup, follow the established related guides rather than treating this buying guide as installation training.
Collection, pumping and a treated opening
One scope collects water, receives it in a basin and pumps it through a discharge. The other addresses a defined opening. Ask which route or location the actual work was intended to address and what completion records describe.
Choose a part name to highlight its explanation below.
- Collection
1. Collection: the channel or pipe shown below the slab edge receives water and connects to the illustrated basin. This does not establish a buried route at any actual property.
- Basin
2. Basin: the sump basin receives the collected water. The illustrated inlet and basin are connected; no outlet is assumed from the presence of a pit alone.
- Pump
3. Pump: the illustrated pump moves collected water through the connected rising discharge. Controls, valves, service access and electrical supply are not detailed, and no capacity or installed performance is asserted.
- Discharge
4. Discharge: the pipe continues outside the model to an unshown receiving destination. Have the actual route and locally appropriate destination established; no sanitary or municipal pipe connection is drawn, and no return to the footing drain is shown.
- Separate treated opening
The separate wall panel is a generic treated strip at a defined opening, not a named injection product or structural reinforcement. It supplies no finding that the treatment stopped a leak. This is a separate example, not a fifth stage in the collection-to-discharge route.
Collection, pumping and a treated opening
One scope collects water, receives it in a basin and pumps it through a discharge. The other addresses a defined opening. Ask which route or location the actual work was intended to address and what completion records describe.
- Collection
- 1. Collection: the channel or pipe shown below the slab edge receives water and connects to the illustrated basin. This does not establish a buried route at any actual property.
- Basin
- 2. Basin: the sump basin receives the collected water. The illustrated inlet and basin are connected; no outlet is assumed from the presence of a pit alone.
- Pump
- 3. Pump: the illustrated pump moves collected water through the connected rising discharge. Controls, valves, service access and electrical supply are not detailed, and no capacity or installed performance is asserted.
- Discharge
- 4. Discharge: the pipe continues outside the model to an unshown receiving destination. Have the actual route and locally appropriate destination established; no sanitary or municipal pipe connection is drawn, and no return to the footing drain is shown.
- Separate treated opening
- The separate wall panel is a generic treated strip at a defined opening, not a named injection product or structural reinforcement. It supplies no finding that the treatment stopped a leak.
- Follow-up
- Ask for the actual purpose, location, route, completion and operating records. Dated follow-up during relevant conditions describes the observed period; it does not guarantee all future performance or invite a flood test.
Read all the diagram text
- Collection, pumping
- and a treated opening
- TWO SEPARATE CONCEPTUAL SCOPES
- A Follow the connected water route
- 1
- 2
- 3
- 4
- Slab / walking surface
- Discharge continues outside the model.
- Receiving destination is not shown.
- B A separate, treated opening
- Defined location
- and treatment
- scope to confirm
- 1 Collection • 2 Basin
- 3 Pump • 4 Discharge
- Follow-up describes an observed period,
- not every future rain or snowmelt event.
Keep learning about the connected parts
- Sump pumps and backwater valves: know each part’s job
- A line in the basement: build a useful foundation observation record
- New-home grading: understand the yard through the seasons
- What a sewer scope can actually prove
- How a house is supported: floors, walls, beams and changes
Canadian context and authorities · Visual atlas · Learning labs

Several climate questions. Different evidence.
An open timber frame above a visible foundation and soil section. Illustrative rain, roof runoff, a gutter and an above-ground downspout discharge. Roof solar panels, exterior window shading and a closed indoor air-cleaner cabinet.
The evidence the illustration cannot supply
Actual ground slope, drainage connections, foundation moisture and flood performance. Solar output, overheating performance and suitable shading for a particular climate. Filter compatibility, achieved clean-air delivery and an appropriate site-specific design. This is a separate conceptual teaching house, not another view of a surveyed property.
Know the parts.
Know what the words mean.
- Mapped scenario
- The specified event or conditions represented by a hazard product.
- Water-entry route
- The actual path by which water reaches the affected location, requiring evidence beyond a stain.
- Foundation wall
- The below-grade wall illustrated as supporting the edge of the house and separating the basement from soil.
- Footing
- The wider supporting base beneath the wall in the concrete-basement example.
- Slab
- The concrete floor surface in the basement example; a different part from the foundation wall.
- Parging
- A coating over a foundation surface; a line in that coating does not show all of the backing material.
- Swale
- A broad shallow depression used to carry surface water along a planned route.
- Perimeter drain
- A foundation drainage component that collects groundwater near the base of the foundation; the actual route and discharge need property-specific confirmation.
- Efflorescence
- A whitish mineral deposit that may form on masonry or concrete as moisture evaporates; not an identification of every white patch or its water source.
Questions to bring
to the conversation.
- What runoff, low spots and discharge locations are visible from accessible ground?
- What is the documented history of dampness, cracking and earlier repairs?
- Who will assess moisture pathways, and who will assess structural concerns?
- Which foundation areas remain inaccessible or unresolved before the purchase decision?
Separate a showing observation, an existing record and a new professional assessment. Unknown means a question remains; it does not automatically mean a defect.
Use the evidence planner ↗Go to the source.
Original HomeAI explanation informed by these public references. Sources support the underlying guidance; they have not reviewed or endorsed HomeAI. Diagrams are conceptual, and calculator outputs depend on your inputs.
Canadian building-science education with Calgary municipal examples kept local. The source readings were retained on October 22, 2026; page dates, geography and reading limits remain with each reference. Illustrations explain parts, routes and comparison questions rather than findings for a property. Ask qualified professionals about the actual design, condition, local requirements and repair scope.
Publication & source review
First published .
Sources reviewed .
- Government of Canada · Property grading
- City of Calgary · Lot grading and positive drainage
- City of Calgary · Basement flooding and seepage
- City of Calgary · Heavy rain and flooding hazards
- Natural Resources Canada · How your house works
- Natural Resources Canada · Flood mapping types and process
- Public Safety Canada · Flood risk and provincial resources
- Environment and Climate Change Canada · Canadian Climate Normals
- Natural Resources Canada · Keeping the Heat In, Section 6: Basement insulation
- Natural Resources Canada · Keeping the Heat In, Section 2: How your house works
- City of Calgary · Basement flooding and seepage
- City of Calgary · Lot grading and positive drainage
- Government of Canada · Property grading
- Government of Canada · Foundation maintenance
- Government of Canada · French drains, trench drains and weeping tiles
- Government of Canada · Basement window maintenance
- Natural Resources Canada · Flood mapping types and process
Have a question about your home?
Start with the symptom, timing and what you have observed.
Ask HomeAI